Eglantine on Mac: setup, forks & game compatibility
Eglantine can run some Switch 2 game content on Apple silicon, but results depend on the game and the exact build. Start with the Mac download, then work through first launch, your game folder and controller input.
Apple siliconM-series MacmacOS 15+Upstream Mac packageExperimentalExpect game-specific faults
Updated 2 November 2026 · Current download reference: upstream build 121 / 9c55e70 · Setup screenshots: tutorial fork d8a9528.
Choose the project before the build number
Upstream now publishes a Mac download. Older tutorials show a separate fork because the main repository did not offer one at the time. A newer build number on another fork does not identify the same code.
Start here for the current upstream Mac package. In Assets, select the ZIP ending in macos-arm64.zip. The release requires Apple silicon and macOS 15 or later.
Use this reference to match the screenshots below. The Mac ZIP includes ci-d8a9528 in its name; the separately tested Windows file in the same release has a different source revision. Its Mac notes specify JIT (runtime CPU translation), not native code execution (NCE).
The 2.0.0 release includes PokeDinner-macOS-arm64-c3ce9bc.zip. The newer 2.1.0a entry lists a Windows package. Check the actual assets instead of assuming the newest release is a Mac update.
Eglantine is an emulator. Its Mac application is not an official native game release. nxnative builds individual game apps and uses a different workflow; its commands and performance results do not transfer to Eglantine.
Install the Mac app
Check the Mac and choose the ZIP
Open Apple menu → About This Mac. Confirm an Apple M-series chip and macOS 15 or newer. Open the selected project’s release page, expand Assets and download its macOS ARM64 application ZIP, not “Source code” or a Windows archive.
The recorded example is the fork’s ci-d8a9528 Mac ZIP. Today’s upstream filename uses 9c55e70…-macos-arm64.zip.
Extract and move the application
Double-click the ZIP in Finder. Move eglantine.app to Applications, then open it. Keep the downloaded archive and its release link so you can identify or restore this build later.
Handle the first-open warning
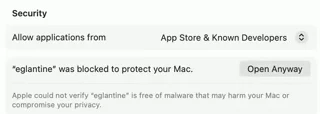
If macOS says Apple could not verify the downloaded app, confirm that it came from the intended release. Open System Settings → Privacy & Security, scroll to Security and use Open Anyway for that application. Confirm the macOS prompt with Touch ID or your administrator password.
The button appears after the blocked launch. This screenshot shows the specific eglantine entry.
If the message says the app will damage your computer, or the warning is different, use the macOS warning guide before proceeding. Do not disable Gatekeeper for the whole Mac.
Add your game, not another project’s build folder
You supply your own lawfully obtained game data and any required console files. This site and the linked setup tools do not supply games, keys or firmware.
Fully decrypted game directory
The tutorial describes a directory containing the game’s decrypted ExeFS and RomFS data. Its “no keys needed” remark applies to that prepared input. Keep the extracted layout intact and choose the folder containing your game entries.
Encrypted package or a different fork
Do not apply the decrypted-folder instructions to every XCI or NSP. Follow the chosen project’s requirements for your own package and matching console files. The PokeDinner video discusses a different setup; it is not proof that every game needs the same files.
In the library, choose Add New Game Directory, then select your game folder in Finder.
Allow the app to access that folder if macOS asks.
Confirm that the intended game appears in the library. A blank list means the directory or file format still needs attention.
Open one game and wait for its first loading stage. Reaching a title screen is a useful first check, but does not confirm working gameplay.
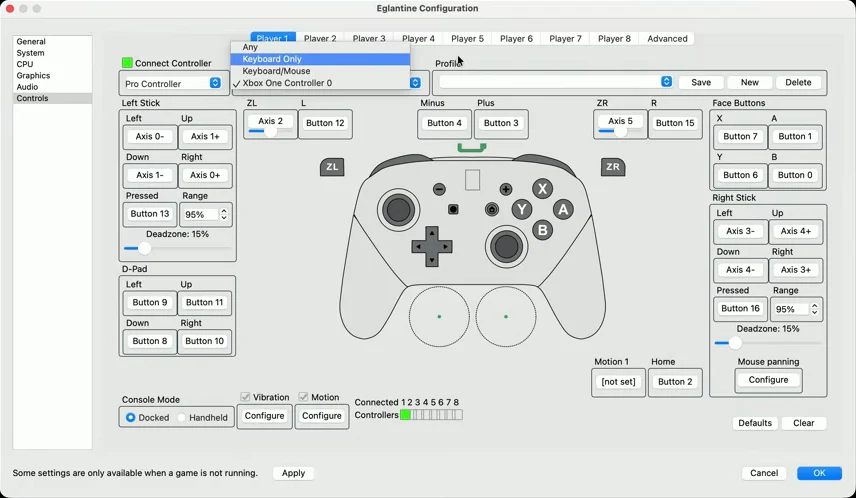
Recorded fork d8a9528: Controls → Player 1. The device menu selects Xbox One Controller 0; Pro Controller describes the emulated controller, not the physical hardware. Tap the image to enlarge.
Open the app’s Preferences / Configuration window and choose Controls.
Select Player 1 and enable Connect Controller.
Choose the intended emulated controller type, then select your physical controller under Input Device. Avoid leaving this on Keyboard Only if you want the gamepad.
Check the sticks and buttons in the mapping view. Use the game’s on-screen prompts to confirm A/B and X/Y positions; the letters printed on an Xbox pad differ from Nintendo’s arrangement.
Use Apply and OK, then test movement and confirm/cancel in the game. Change one mapping at a time if an action is wrong.
The screenshot demonstrates device selection. It does not establish working gyro, vibration or every controller model on every fork.
What the demonstrations actually show
Fast Fusion: separate setup from the custom build
The Mac tutorial shows installation and controls using the downloadable fork, then shows gameplay from a separately modified build. Its discussion of nxnative and high refresh rates is not a benchmark of the stock Mac ZIP.
Pokopia: reaches gameplay, with visible limits
The longer Mac recording reaches character creation, movement, dialogue and early interactions. The author reports missing models and slow gameplay. CPU/GPU boost and handheld-mode experiments do not produce a useful improvement in that recording.
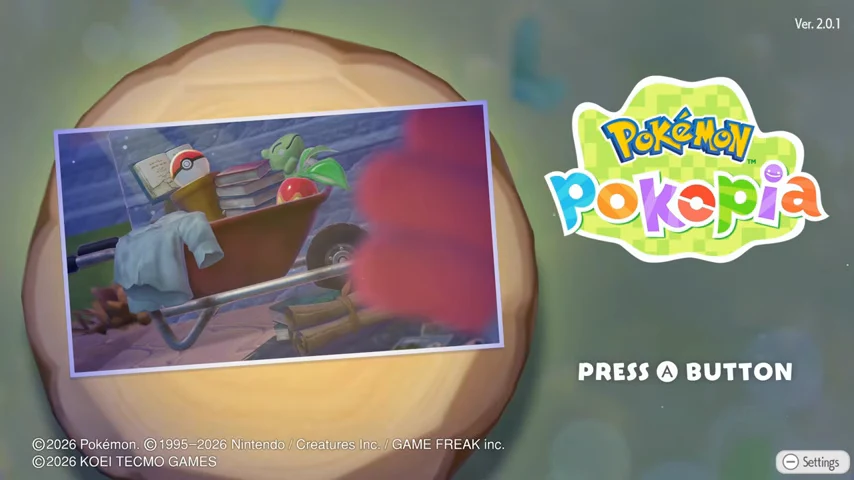
The recording’s title screen at 22:35 shows game version 2.0.1. That is the game version, not the PokeDinner release number.
The restart at the end is not a fix. The author initially sees a faster menu after relaunching, but withdraws the improvement claim when gameplay resumes. This is why menu FPS should not be used as a gameplay result.
What about the newer PokeDinner hypervisor changes?
PR #38, merged on 1 November, adds an opt-in Apple Hypervisor backend and shutdown fixes. It is later than the Mac archive listed under 2.0.0. The contributor’s report uses a modified source build, an 8 GB M3 MacBook Air and Pokopia 1.0.4—not the game version shown above.
Do not assume the downloaded 2.0.0 app includes those changes, or paste its experimental environment flag into another fork. Match a release or source revision that explicitly contains the change first.
The supplied Mario Kart World benchmark uses an RTX 5080 and Ryzen 7 9800X3D PC. It cannot establish Mac performance or a Mac memory requirement. We have not measured these games locally.
Find the stage that fails
The app will not open at all
Check that the archive is for macOS ARM64 and that your Mac meets its release requirements.
Extract the ZIP before opening the app; do not try to run the source archive.
Match the exact macOS warning to the first-open guide. A crash after launch is a different problem from a blocked download.
The game library is empty or a file will not load
Confirm the selected directory contains the intended game data, not just the application or ZIP.
Check folder access if macOS denied permission.
Identify whether your input is a decrypted directory or an encrypted package. Recheck the chosen fork’s input requirements before changing graphics settings.
The controller is connected, but nothing happens
Confirm macOS still sees the device, especially after reconnecting Bluetooth.
Return to Player 1, enable Connect Controller and select the physical device again.
Test a mapped button, apply the settings, then return to the game. Fix reversed confirm/cancel mappings separately from a missing device.
Graphics options are greyed out
Stop the running game before editing settings that are locked during play. The recorded configuration window explicitly says some settings are only available when a game is not running.
Disabled API/device fields in the recorded fork. They are not evidence that the Mac lacks a GPU.
Reopen Configuration after stopping the game. If a setting remains unavailable, check that fork’s support rather than copying values from a Windows video.
The title screen works, but gameplay is slow or incomplete
Record the app’s fork/revision and the game’s version separately.
Compare the same scene with the same settings. Do not compare a menu with a busy area.
Undo experimental settings that made no difference. The supplied Pokopia video does not support a universal boost or restart fix.
Look for a release note addressing your exact symptom. Missing models and rendering faults can require a code fix; a resolution change is not a general repair.
The game or app crashes
Keep the previous working app, record when the crash happens and retain the crash report. Include the Mac chip, memory, macOS, fork/revision, game version and last action in an upstream issue. Remove personal paths from anything you share.
For a crash specifically on closing PokeDinner, compare your revision with PR #38’s shutdown changes. That source fix does not prove every published Mac package includes it.
Keep a route back before changing builds
Keep the old app and release URL. Store each archive under its fork and revision so similarly named downloads do not get mixed up.
Back up the actual save and configuration folders. Locate them through your build’s menus or documentation and copy them with the app closed. Do not assume TOTK’s native-port paths apply to this emulator.
Change one component at a time. Keep the game version and settings fixed while testing a new app build. Check that the intended save still loads before removing any backup.
Treat a fork switch separately. Shared ancestry does not prove identical save paths, settings or migration behavior. Avoid overwriting a working profile to try another fork.
The cropped English screenshots show the relevant software or game area. Setup images come from the recorded fork, so menus may differ in a newer build.