Apple silicon + macOS 15 or later
Download FX-Steam-Launcher-1.9.9.dmg from the original release. The app is signed and notarized. The release already includes its runtime components.
WINDOWS STEAM GAMES · APPLE SILICON
FX Steam Launcher runs SteamOS in a virtual machine on your Mac. Install its ready-made app, create a SteamOS disk and sign in to Steam to try your Windows library. Use this guide to choose the download, set the graphics path and recover from a failed launch.
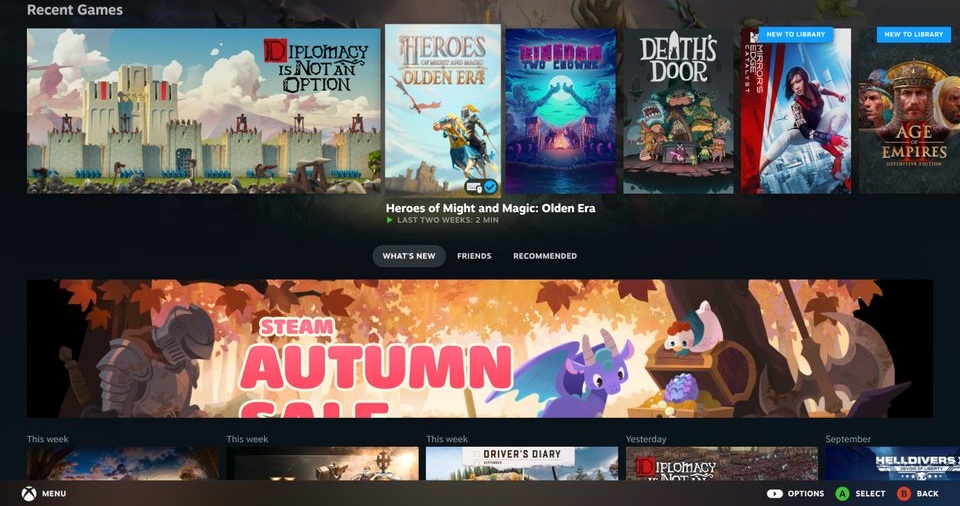
Guide version: FX Steam Launcher 1.9.9 · released 3 November 2026 · Apple silicon, macOS 15+.
The GitHub project is fxgl/steamac. It is an independent launcher using Valve’s ARM64 SteamOS image. Windows games run through Proton and FEX inside that VM, with their graphics reaching the Mac’s Metal GPU through the selected graphics backend.
You do not need to install Windows or replace macOS to use FX Steam Launcher. Your SteamOS disk is a file on the Mac. A native Mac edition remains the direct choice when the publisher provides one; use the VM for the Windows titles you want to investigate.
Download FX-Steam-Launcher-1.9.9.dmg from the original release. The app is signed and notarized. The release already includes its runtime components.
The project’s installer guidance budgets about 14 GB for the initial disk and 6 GB for its download cache. Installed games need additional space as the sparse disk grows.
Open the release’s Assets list and select the DMG. The GPL sources TAR and GitHub’s source-code ZIP are for source work, rather than the ready-to-open application.
Open the downloaded DMG and drag FX Steam Launcher into Applications. Open that copy and complete the normal downloaded-app prompt. Use the macOS warning guide if the message differs from a normal first-open confirmation.
The DMG workflow creates the SteamOS disk itself. You do not need Xcode, Homebrew or Docker just to follow it. Those tools belong to building the launcher from source.
macOS 26 or later: the release can use KosmicKrisp for its Metal 4 Vulkan path. On macOS 15, use MoltenVK. Match the game and driver in the settings walkthrough.
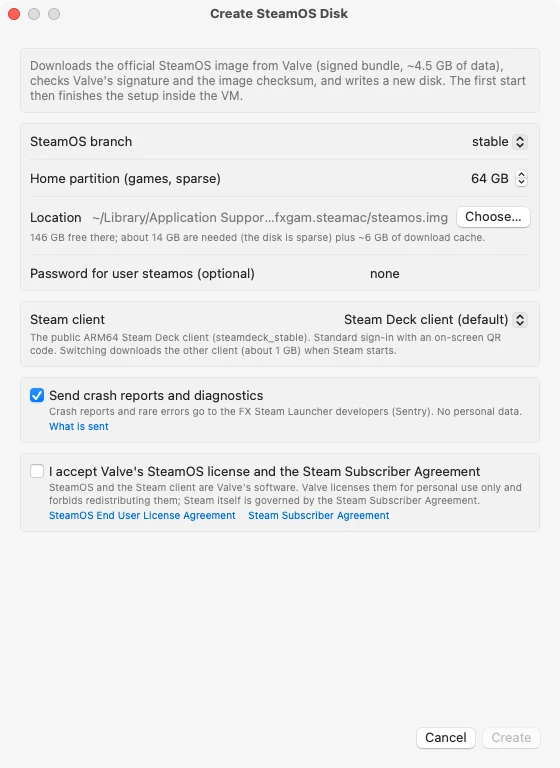
On first launch, choose Create New Disk…. You can reopen it through Settings → Advanced → Create New Disk…. This creates a SteamOS disk image; it does not format the Mac’s system disk.
01Set the branch, sparse capacity and disk location
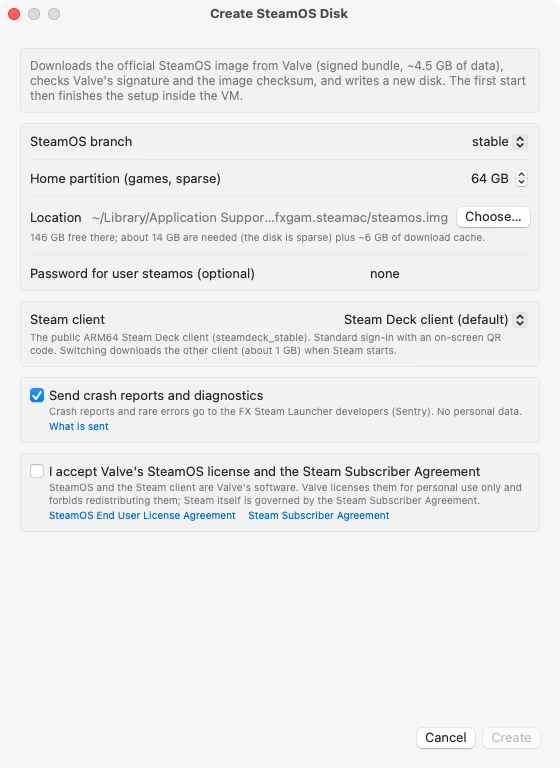
02Review the terms before creating the disk
03Start after completing your choices
The released launcher offers stable and rc. Use stable for the first setup. A tutorial naming beta, preview or main may refer to a different stage of the project; keep the launcher version and image branch together.
Choose the home-partition capacity for the library you intend to install. A 64 GB sparse home partition does not immediately consume 64 GB on the host. Check free space again before downloading a large game. Use a writable volume; the creator rejects FAT32 and read-only destinations.
The default image is ~/Library/Application Support/es.fxgam.steamac/steamos.img. Use Choose… if you want a different drive. Keep that drive attached when running the VM.
Read Valve’s linked terms and make your own acceptance choice. After acceptance enables Create, start the download. The launcher downloads Valve’s signed image, verifies it and writes the disk. Watch the progress rather than opening a second setup.
If you stop the transfer, use the creator’s Resume path. Keep its download cache while resuming. A proxy, network interruption or insufficient free space needs fixing before a retry; recreating the whole disk is not the first response.
After creation, boot the selected disk. The first start completes additional setup inside the VM before the Steam interface appears.
The default Steam Deck client presents a gamepad-style interface. Give the initial client update time to finish before treating the startup screen as a failed game launch.
Use your own Steam account and the on-screen sign-in flow. The default client supports QR-code sign-in. Your normal macOS Steam installation is a separate application; its Mac game folders are not automatically this VM’s installed library.
Use the project’s game reports to check the title, Mac and graphics path first. Install through Steam. Steam supplies the game’s required compatibility components, including Proton and FEX, as needed.
Start with default in-game settings and a modest output resolution. Allow first-run shader processing to finish. Reach the same scene twice before deciding whether a hitch is first-use compilation or a repeated problem.
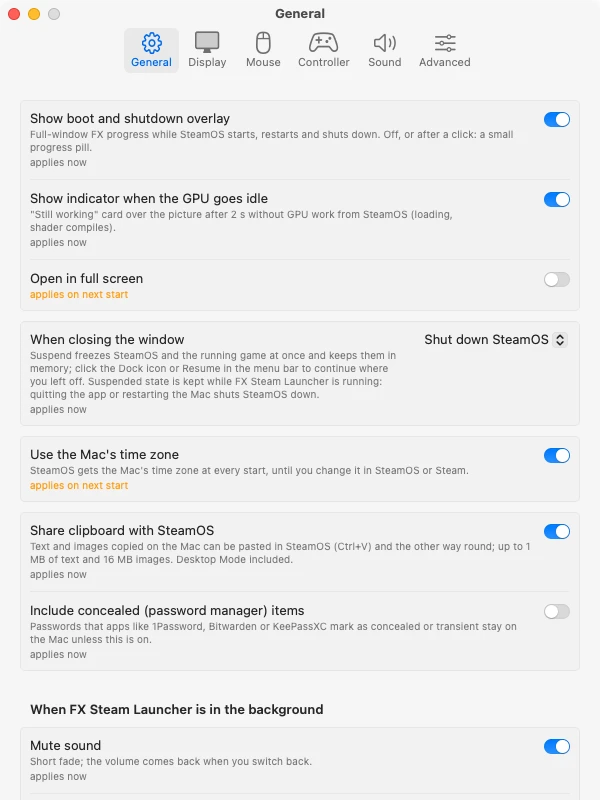
When entering Steam launch options inside the guest, paste with Ctrl + V. The launcher’s shared clipboard setting is under General. Keep game-specific launch options tied to that game; do not paste one title’s feature-level override into every game.
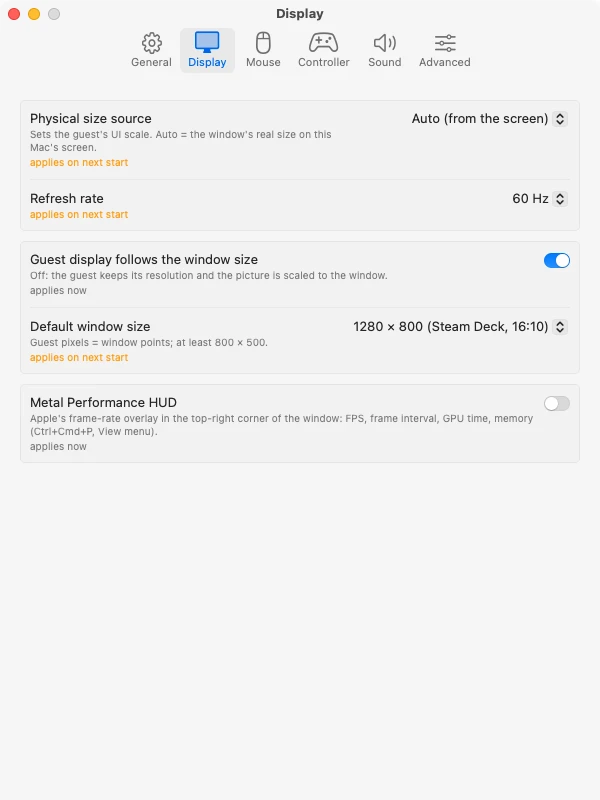
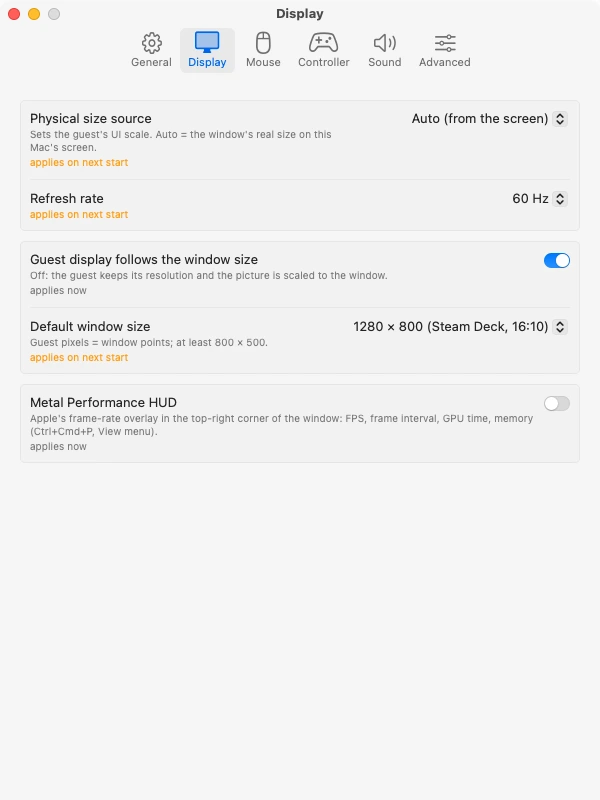
Open FX Steam Launcher → Settings… with Command + ,. The window labels each option applies now or applies on next start. For a pending change, save your game and use Restart VM to apply.
01Choose a fixed output, then inspect the same scene
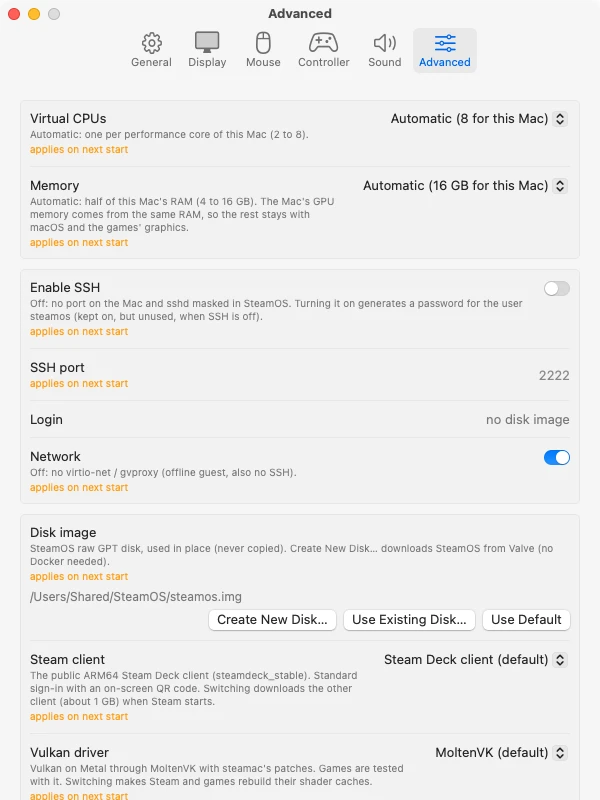
The Vulkan route for macOS 15 and the fallback when KosmicKrisp is unavailable. It is also a useful comparison when a title loses its GPU on KosmicKrisp.
The release default where available on macOS 26+. It uses Metal 4 and supports the project’s DirectX 12 feature-level 12_0 path. Check your game’s report before choosing higher feature overrides.
An optional DirectX 10/11-to-Metal path. Choose it through a game’s graphics profile when available; it is separate from changing the Vulkan driver for DXVK or vkd3d-proton.
01Keep CPU and memory on Automatic for the first comparison
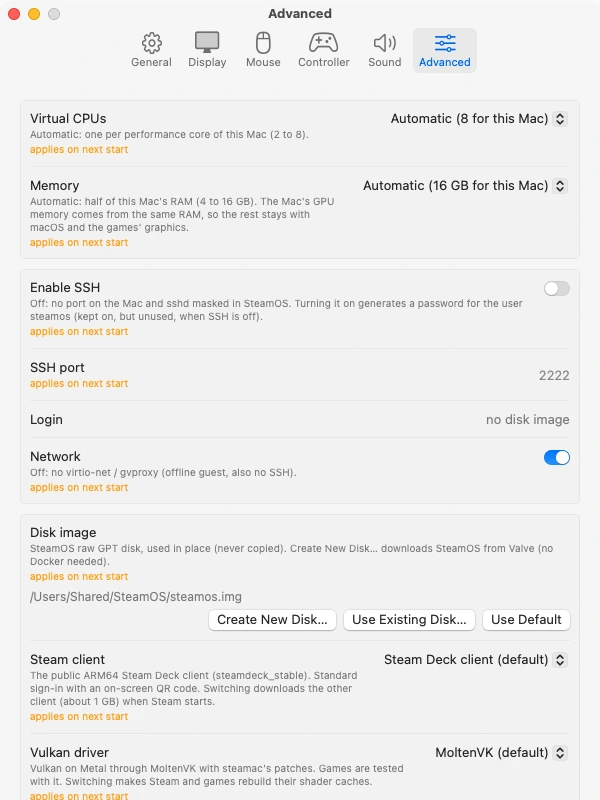
02Change the Vulkan backend for the next start
Guest RAM, host graphics allocations and macOS all share the Mac’s physical memory. Start with Automatic; do not assign all RAM to the guest. If Activity Monitor shows sustained memory pressure or swapping, close other heavy applications and reduce the VM allocation before raising resolution. More virtual CPUs are not automatically better for every game.
Since 1.9.9, the launcher removes the Steam Frame CPU-affinity restriction that previously left some configured vCPUs unused. Update an older launcher before interpreting a CPU allocation comparison.
The useful question is whether your game’s build works on a comparable Mac and graphics path. Open the project’s live game statistics, search by title or Steam app ID, and read its player ratings as well as the launch result.
Match the Steam app ID. A demo, remaster and original release may have different requirements.
Check reported GPU cores, memory, driver and VM settings. Use My Mac to narrow the reports the site offers.
A successful process launch and a playable game are different results. Read “Playable with issues” or “Does not start” alongside session figures.
Try the site’s game search before treating a missing result as incompatible. Clear the game name or relax active limits if no report appears. The statistics page counts guest frame output; use your own in-game comparison for settings decisions.
For multiplayer games, check the title’s current anti-cheat and VM restrictions. A Steam Deck compatibility badge alone does not settle compatibility with this Mac VM. Use the normal supported sign-in route and retain the game’s current report if it refuses to launch.
Separate the launcher’s boot progress, the first Steam client update and a selected game’s shader processing. Let changing progress finish. If the same point repeats after a restart, open Help → Report a Problem… and inspect the current session’s details.
Check Activity Monitor’s Memory Pressure, lower guest resolution and review the VM’s allocation. Keep room for host GPU work and macOS. Retest one change at a time. A larger guest memory value cannot add physical RAM.
First check the device in macOS using the controller pairing guide. Then use FX Steam Launcher’s Controller tab and its live input test. For a game that needs a free pointer, inspect Mouse → Capture the mouse in games. The launcher’s settings window remains available with Command + comma.
Use Help → Report a Problem…. Describe the shortest repeatable sequence, your launcher/game versions, Mac and graphics path. Review the offered log attachments before sending. For a Windows game that needs a Proton log, set its Steam Launch Options to the command below, reproduce once, then make the report. Remove the option after the diagnostic run.
PROTON_LOG=1 %command%The application and your SteamOS disk are separate. For an ordinary launcher update, keep the existing disk and select it again in Advanced if necessary. Choosing Create New Disk instead starts a different environment.
Save in the game. For titles using Steam Cloud, wait for Steam’s sync status before shutting down. Keep a local backup for progress you need to protect.
Close the running game and shut down SteamOS normally. In Advanced, identify the actual Disk image path, then copy that stopped disk to your backup location. Check destination capacity; sparse images can copy differently between filesystems.
Use the app’s Check for Updates or the original GitHub release. Replace the launcher application, retain the disk and reopen it. Let any SteamOS or client update finish, then verify your installed game and save before cleaning old backups.
01Save before closing or suspending
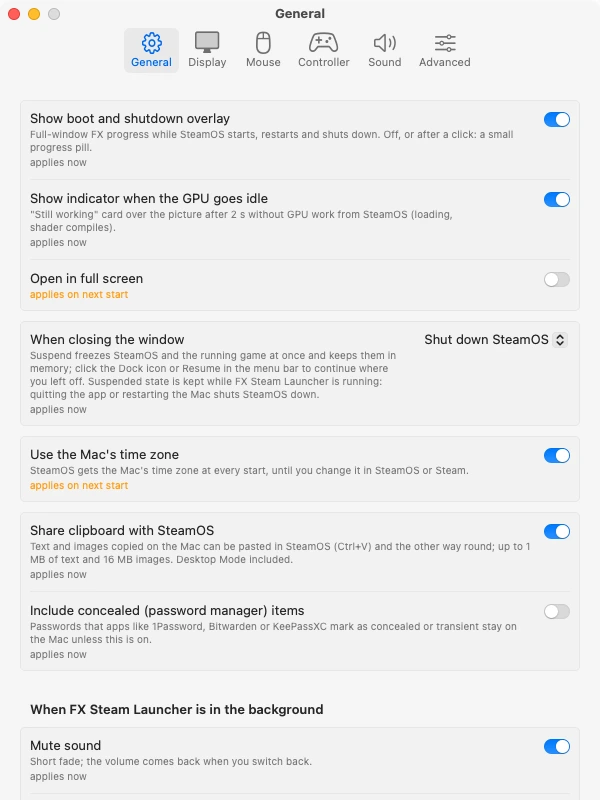
Suspending keeps the VM’s memory allocated. Quitting the app, restarting the Mac or an app crash ends that in-memory state. Continue to save in the game even when you use Suspend between sessions.
Browse the other Mac gaming projects →Find an official native Steam game →Compare the ways games run on Mac →
Sources: release 1.9.9 · setup, settings and reporting · live project game reports. Screenshots are credited English UI excerpts from the project’s published documentation. Guide updated 4 November 2026.