WINDOWS x86-64
Use the NX2navi installer
Windows 10 or 11 is the main player workflow. Setup installs the launcher; your own game dump supplies the game. Follow the steps on this page.
Choose the Windows file →OCARINA OF TIME / PC RECOMPILATION
NX2navi is a static recompilation of Switch 2 Ocarina of Time 1.1.1 for x86-64 Windows and Linux. Its GitHub repository is tangerineturtle1/NX2navi. On Windows, download Setup and let the launcher build locally from your own game dump.
Guide reviewed 14 November 2026 · NX2navi 0.10.1 · Game 1.1.1 · Release notes & assets ↗
NX2navi 0.10.1 has Windows and Linux x86-64 packages. For an Apple silicon Mac, choose a separate Mac project for the edition you own: Ship of Harkinian for N64 Ocarina, or nxnative’s specific Switch 2 Ocarina profile.
WINDOWS x86-64
Windows 10 or 11 is the main player workflow. Setup installs the launcher; your own game dump supplies the game. Follow the steps on this page.
Choose the Windows file →LINUX x86-64
The release also includes a Linux AppImage that builds locally. It uses Linux drivers and dependencies; the Windows installer is a different route.
Read the Linux branch →APPLE SILICON / macOS
For N64 Ocarina, use Ship of Harkinian’s Mac app. For the Switch 2 edition, nxnative has a separate Apple-silicon game profile and toolchain.
Find the nxnative profile →For an iPhone or iPad, follow the device support of the separate Apple builder you choose. Compare NX2navi, nxnative, NX2Apple and Ship of Harkinian before downloading.
The Windows player download is NX2navi-Setup-0.10.1.exe from the official GitHub release. Choose it for a new installation; the app and runtime ZIPs are updater components. If the direct link fails, open 0.10.1 → Assets and select the same filename. You do not need Git, Visual Studio or a manual Python installation for this player route.
Get-FileHash .\NX2navi-Setup-0.10.1.exe -Algorithm SHA256For this exact release file, the GitHub asset digest is:
84f2aae815bdbce6c7b4d349a235f34a372300d10d77e4bf35eac71142507c11A later Setup has a different digest. Compare against that later release’s asset instead of reusing this value.
Setup is unsigned, so Windows may show SmartScreen on first launch. Check the source, filename and file hash before deciding to run it. An unexpected antivirus detection or a different publisher is a reason to stop and investigate the file.
The game version is 1.1.1; the NX2navi program version is 0.10.1. Updating one does not update the other. Use files legally dumped from your own Nintendo Switch 2; this site and the project supply tools, not game dumps or keys.
0400486024DEC000; the build kit identifies main build e0f3ccfa..nup is the normal launcher input. The manual kit also documents extracted exefs and romfs.VK_EXT_external_memory_host. Mesh-shader-capable graphics are the standard route.The 0.9.2 release introduced an optional Low-end GPU mode (experimental) for older cards, including a compute-based mesh fallback. It is off by default and does not remove the Vulkan or memory requirements. Use the version-specific settings below if this is your hardware. Keep the current automatic CPU helper-thread choice before importing older experimental settings.
Run the official Setup, choose your supported .nup and output folder, then select Begin Installation. After the local build finishes, choose Play and open the running game’s F1 menu to continue with settings.
Put the downloaded Setup and your game’s .nup in the same folder, then start Setup. The default launcher location is %LOCALAPPDATA%\Programs\NX2navi. It does not normally require administrator rights.
The launcher looks beside Setup and in common folders. Select Game Dump to choose the correct file if it is not found. Select Install Folder to choose where the large built game will live. This is separate from the small launcher installation.

Select Game Dump to choose the input
The English 0.9.2 Game Dump row before a game is supplied. Select it to choose your supported .nup. Use Install Folder, described above, for the separate output destination.
Image source ↗ Open full-size image ↗
The launcher gathers tools, inspects and unpacks the game, translates its code, compiles it and prepares shaders. Newer packages can also draw controller prompts and check the game files. Keep the computer powered and allow time for each stage; the source guide budgets 20–45 minutes for a first build, while individual release notes quote shorter examples.
The shader-preparation stage can continue even when its count pauses. Read the current stage and log rather than restarting the whole installation because a bar has briefly stopped.
The launcher hides while the game runs and returns after it closes. Press F1 for in-game settings, or Minus + Plus on a controller. Start with a short baseline run before adding mods or experimental settings. Then follow the illustrated mod installation and load-order guide.
Open the built game, bring its window to the foreground and press F1, or Minus + Plus together on a controller. Use Screen for graphics and Controls for inputs; launcher Settings handles updates and folders.
Begin with the default 60 fps limit, a modest resolution and Texture detail on Automatic. Watch the F10 overlay while revisiting the same scene. Adjust one option at a time.
DLSS upscaling is for NVIDIA RTX cards. Windows also offers FSR 3.1; FSR 4 has its own supported Radeon/driver requirements. The Screen menu exposes the options available to the current build and hardware.
DLSS frame generation targets RTX 40/50 hardware; FSR frame generation uses a separate path. In 0.10.0–0.10.1, Windows frame generation can work with any Upscaling choice, including Native; the Linux NVIDIA path can still require DLSS upscaling at startup and a restart.
The frame cap counts frames rendered by the game, with generated frames added above it. A displayed generated-frame total is not the underlying game rate.
In Controls, select the input device, check each action and choose Nintendo, Xbox, PlayStation, Steam Deck or keyboard/mouse prompts when the build includes the prompt artwork. Some changes show after restart; use Restart to apply them.
Graphics and timing changes in 0.10.0 ↗ · Adding a code mod? Follow the separate rebuild steps →
Use F1 → Screen for the current controls. To edit the file directly, close the game and open nx2navi.ini beside the game executable. Keep a copy before changing it; a NX2NAVI_* environment variable overrides the matching INI value.
Ocarina uses game_aspect for the shape and game_res for the picture’s height. For a 3440×1440 ultrawide display, start with 21:9 and 1440. The game reads these at startup, so restart after changing them.
Supported heights are 1080, 1440, 1800, 2160, 2880 and window; the window choice has a 1440 minimum. output_res and render_scale do not set Ocarina’s picture size. DLSS/FSR render their share of the picture selected by game_res.
[display]
game_aspect = 21:9
game_res = 1440
HDR · TONE MAPPED
Enable HDR in Windows Use HDR, or use a Wayland compositor with HDR colour management. In Screen choose the tone-mapped HDR option; hdr = 1 applies live under the normal configuration.
HDR · NATIVE
Choose native HDR, or hdr = native, then restart. Match hdr_peak_nits to your display’s peak; game and UI paper-white settings separately control their brightness.
If the menu says in use: off, check the OS/display HDR state first. If it says after restart, restart before comparing. The older hdr_tonemap, hdr_exposure and hdr_gamma keys are no longer read by this version.
That setting leaves the HDR path out of a run started in SDR. The default hdr_live = 1 keeps live switching available. Native HDR still has its own restart requirement.
Start with frame generation off and a rate the PC can hold. With fixed-refresh VSync, a cap that divides the display rate gives an even number of refreshes per game frame. At 120 Hz, 60 fps uses two refreshes per frame; 40 fps uses three. A 90 fps cap uses an uneven one-or-two pattern.
For a 144 Hz fixed-refresh display, the source lists 72, 48 and 36 as even divisors. Variable refresh follows frames within its supported range. With frame generation on, the numeric cap still counts the game’s rendered frames; generated frames come on top. Keep the realtime and highfps_fix defaults enabled before testing above 60 fps.
Only Steam stutters? Compare launch methods → · Picture missing after a change? Start with the visual checks →
Keyboard prompts are drawn from the bindings during the build. After rebinding keys, Rebuild the Game can redraw them. For Steam Deck hardware and library setup, follow the Linux instructions below.
These are the documented default bindings for NX2navi 0.10.1. The game’s Swap Jump Controls option can exchange the jump/put-away actions; your own remaps also take precedence.
| Action | Keyboard / mouse | Controller |
|---|---|---|
| Settings | F1 or Esc | Minus + Plus together |
| Performance overlay | F10 | L3 + R3 together |
| Bug capture | F8 | Use the keyboard while the game is focused |
| Borderless fullscreen | F11 | Use the Screen menu |
| Move / camera | W A S D / mouse or arrow keys | Left / right stick |
| Interact / hold to dash | E or Left Shift | Switch A |
| Jump / put away or cancel | Space / Left Ctrl or Backspace | Switch X / B |
| Sword / target / selected item | Left mouse / right mouse or Z / F or X | Switch Y / ZL / ZR |
| Game menu / map | Tab / M | Plus / Minus |
0.10.1 window keys ↗ · Full mapping reference ↗
Button layout and Button prompts have different jobs. In Controls, layout decides how physical face buttons become Switch actions. Nintendo layout places Switch A on the east button; Xbox/PlayStation layout places it on the south button. Button prompts chooses the artwork displayed by the game.
Choose Nintendo, Xbox, PlayStation or Automatic, then test confirm and cancel. Note any existing custom bindings before changing them; a physical button remapped by hand can keep overriding the selected layout.
Select its key or controller cell, press Enter or A, then press the new input. Esc cancels capture. F1, F8, F10, F11 and Esc are reserved utility keys.
Pick the artwork for your pad or Keyboard and mouse, then apply the requested restart. After keyboard rebinding, Rebuild the Game redraws the prompt files. If the menu says prompt files are missing, check the build’s prompt-art step.
Older 0.9.2 guides show F1 → Game → Low-end GPU mode (experimental). Current 0.10.1 source groups experimental replay/helper controls under Game → Testing; keep the automatic helper-thread value for the first comparison. Automatic can choose zero helpers on a small CPU or older Radeon.
These are selected changes that affect installation and play. All rows refer to the NX2navi program; the required game remains 1.1.1.
| Version | Change | Your action |
|---|---|---|
| 0.10.1 · 13 Nov UTC | Fixes video memory growing rapidly while walking or turning the camera in 0.10.0. | Update 0.10.0 before tuning graphics. Only a few files compile again; existing game files and prepared shaders stay. |
| 0.10.0 · 13 Nov UTC | High-frame-rate movement and sound fixes; Native 100% scaling, expanded frame generation, low-latency controls and F8 bug captures. | Older installations retranslate the game once. Use 0.10.1 for these features plus its memory fix. |
| 0.9.2 · 12 Nov | Optional Low-end GPU mode, fixes for FSR mode-switch crashes, hidden-HUD upscaling and texture flicker. | Update first if these symptoms match. Leave experimental GPU options off for the first baseline run. |
| 0.9.1 · 12 Nov | Launcher Mods screen, more pipeline preparation and multi-core draw replay enabled by default. | Use the launcher to manage mods; compare a clean run before diagnosing a modified game. |
| 0.9.0 · 12 Nov | Expanded graphics and input work, including a fix for a resting or virtual gamepad axis unexpectedly taking control. | Old controller reports may describe earlier behaviour. Retest input after updating. |
| 0.8.0 · 11 Nov | FSR 4, initial fallback for GPUs without mesh shaders and several AMD/crash fixes. | Check the newer 0.9.2 low-end route rather than copying old experimental flags. |
| 0.7.0–0.7.1 · 10 Nov | Linux AppImage, save-sharing ZIPs, DLSS frame generation and lower-VRAM texture choices. | Older videos may not show the current Saves screen or available graphics controls. |
| 0.6.0–0.6.1 · 9 Nov | Incremental launcher updates preserve the compiled game and prepared shaders. | Use Updates in your existing launcher; a fresh Setup is usually unnecessary. |
Read the original release notes ↗. The current entry is 0.10.1, published 13 November UTC / 14 November Beijing time.
Normal launcher updates keep existing saves and settings. Export a save backup first, then use Updates while the game is closed. Updating the program rebuilds changed components; it does not install a different game update or replace your progress.
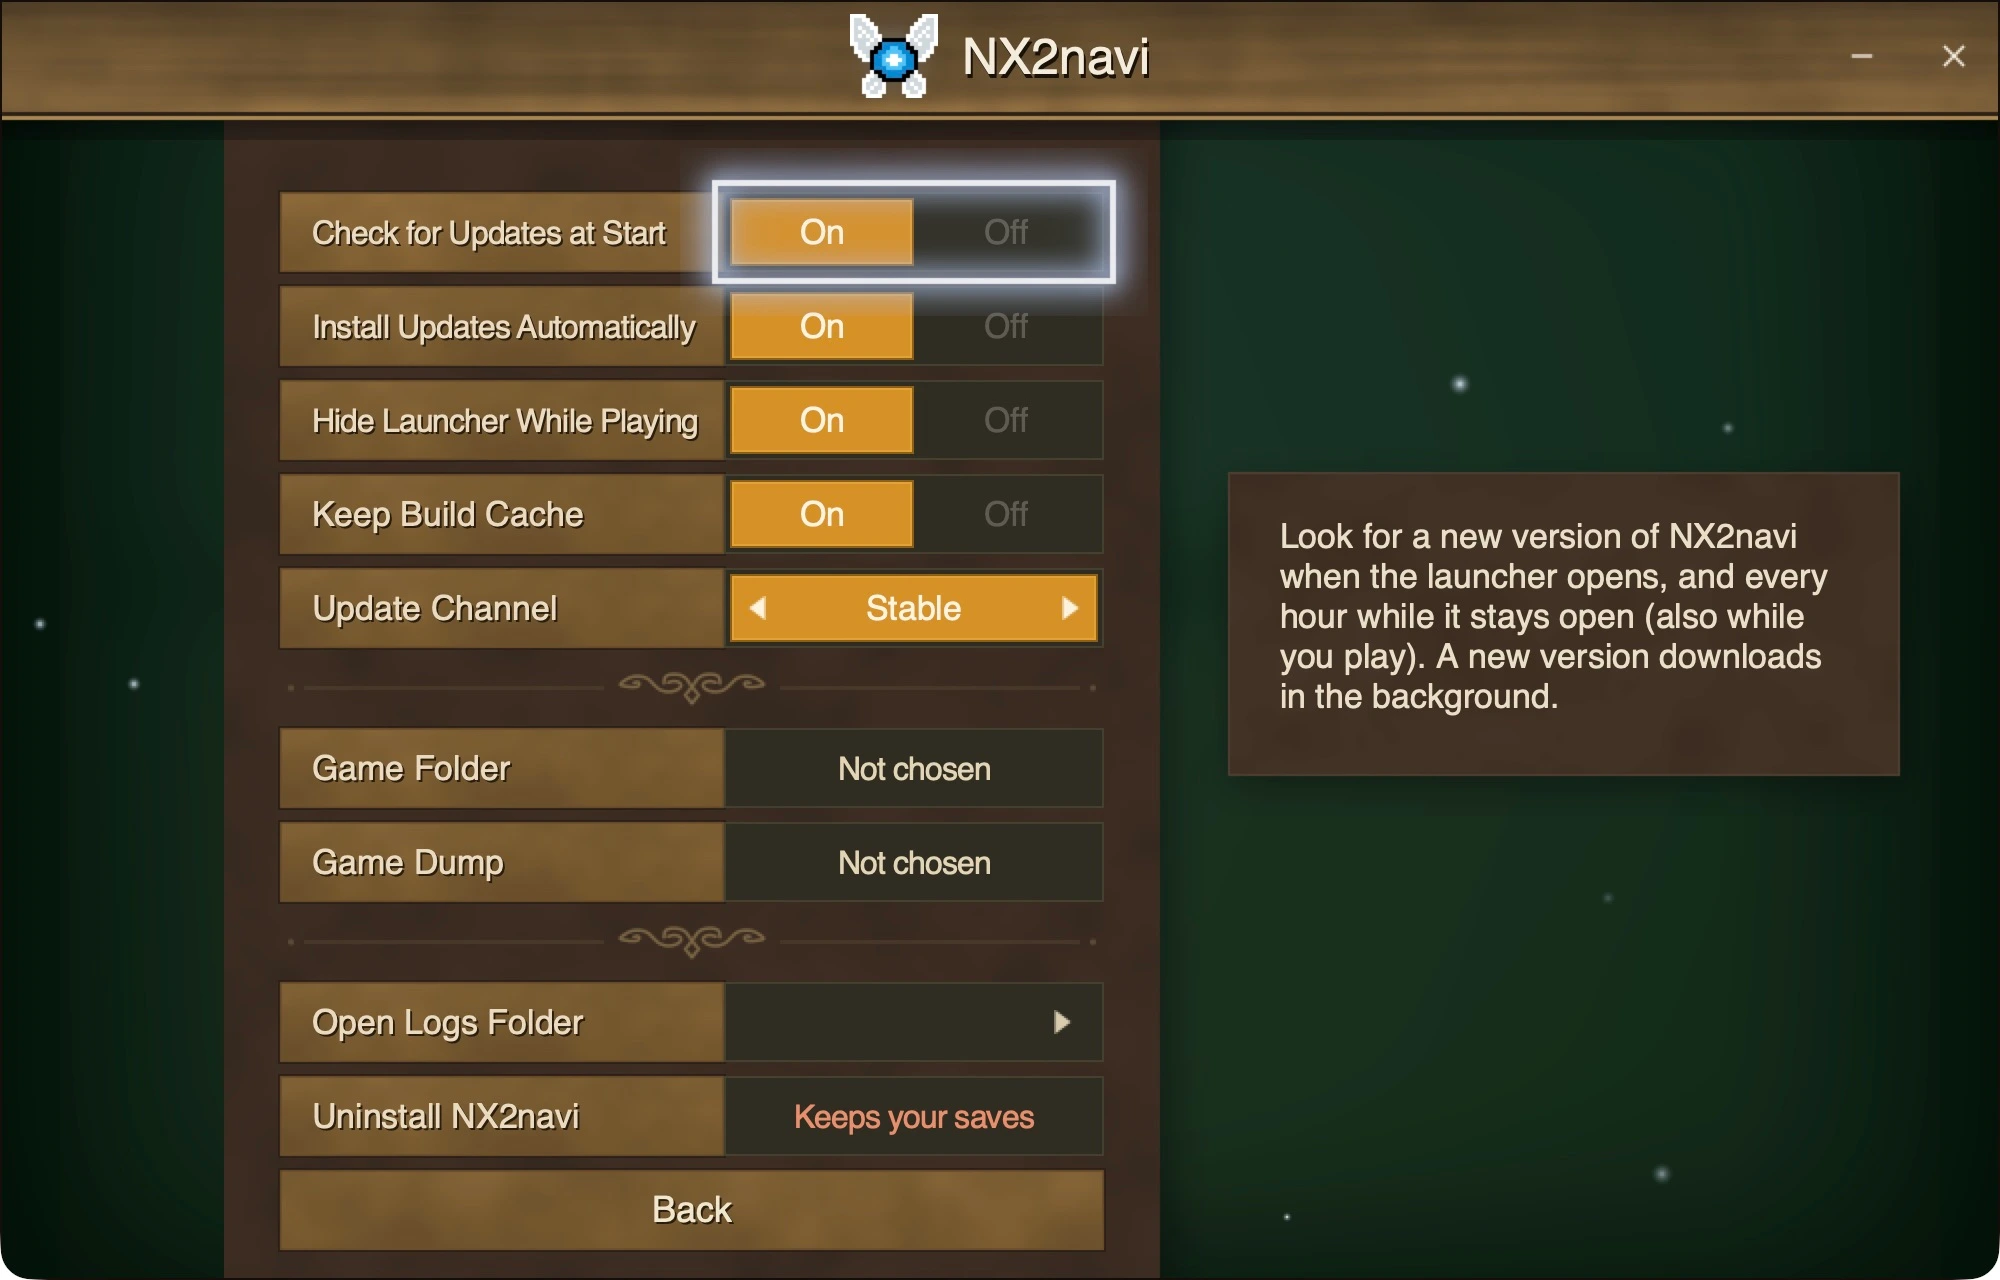
Automatic checks and installation are separate
Keep reusable work and choose Stable
The 0.9.2 launcher’s English Settings view. Update Channel selects Stable or Preview; Keep Build Cache retains reusable compiled work. These are launcher choices, separate from the game’s F1 picture menu.
Image source ↗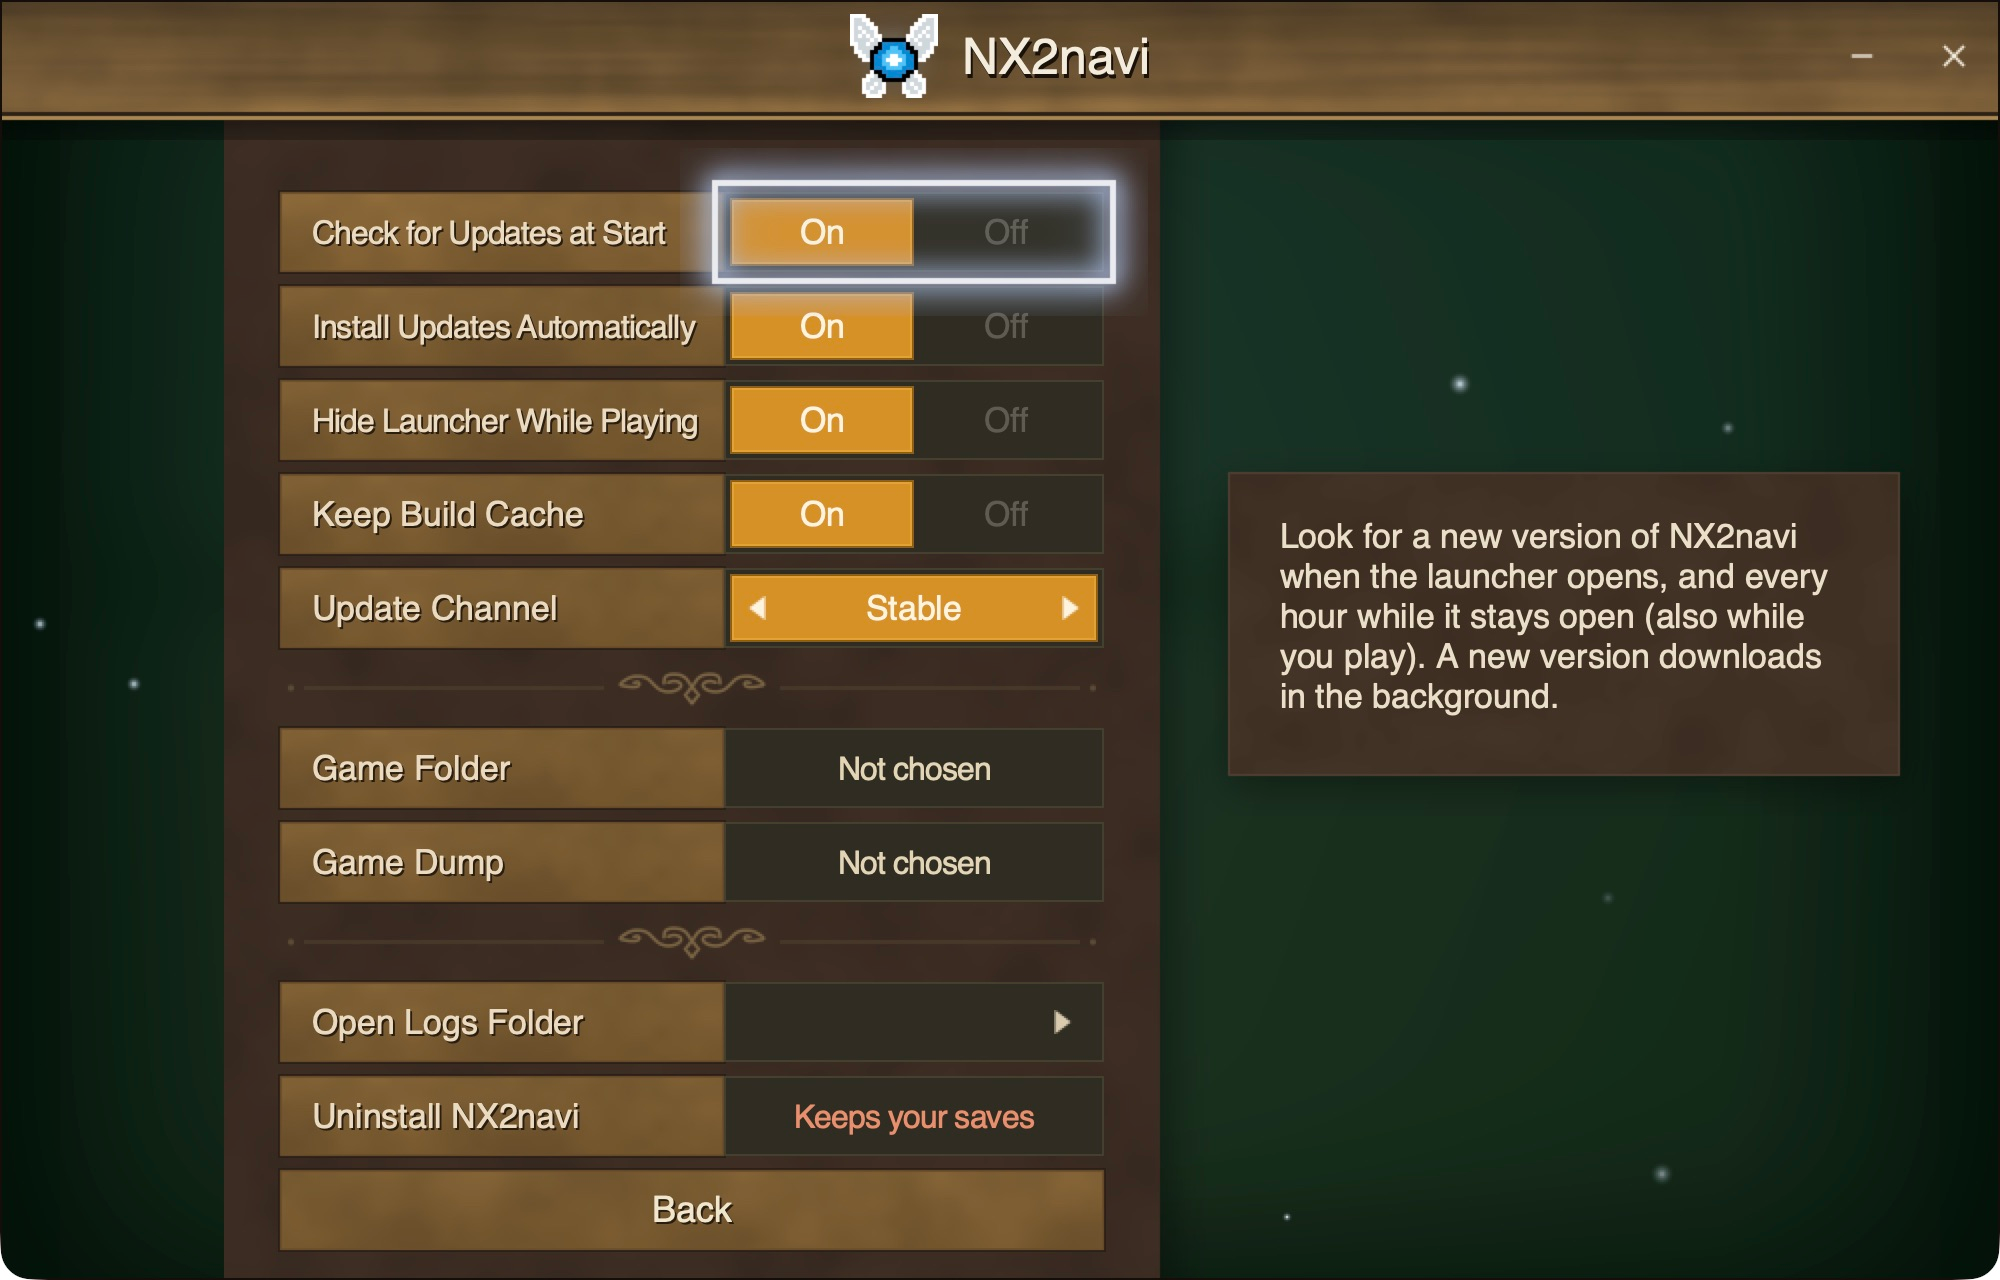 Open full-size image ↗
Use Updates to install 0.10.1. The memory fix recompiles only a few files; the compiled game and prepared shaders remain.
The 0.10 update translates the game’s code again for its frame-rate fixes. Let that stage complete. A longer update here is expected; keep the existing unpacked game data and your save export.
Close the game, open Saves → Export Save, and keep the ZIP outside the game folder. Record the current NX2navi version and your important settings in nx2navi.ini.
Open the launcher’s Settings. With update checks enabled, it checks on startup and periodically while open. If Install Updates Automatically is off, choose Updates yourself.
The launcher can download an update during play, then installs it after the game exits. Existing unpacked game files and saves stay in place; only changed build work is repeated. Keep Build Cache makes future updates cheaper in time and disk work.
Start the updated build, check F1 for the new program version, load your usual save and revisit one known scene. If an update was interrupted, use Rebuild the Game to finish rather than deleting the game folder.
The launcher retains its current and previous application versions for startup rollback. That is separate from restoring an older playable game build or a save: keep your own save export even when automatic rollback is available. A first update from 0.5.0 retains its old generic CPU build until Rebuild the Game retunes it for this PC.
Open Game Folder in the launcher. NX2navi’s active save files are under profile\save\<account>\ inside that built game folder; profile\account.uid identifies the account. Use Saves → Export Save to back up the progress the game would load, including a completed save transaction waiting to be applied. Close the game first so its in-memory progress cannot overwrite restored files.
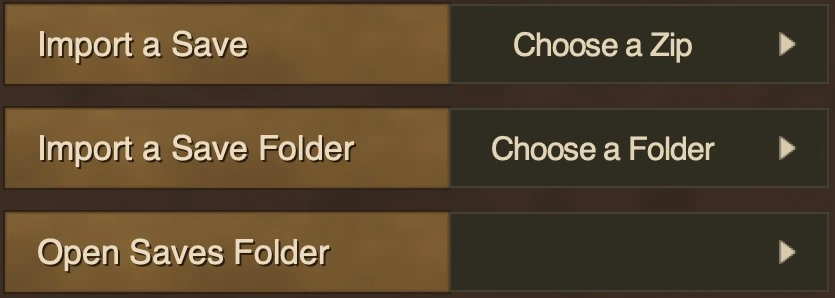
ZIP and folder import have their own rows
The actual English import rows in the 0.9.2 Saves panel. Import a Save selects a ZIP; Import a Save Folder selects extracted progress. Keep these two routes separate.
Image source ↗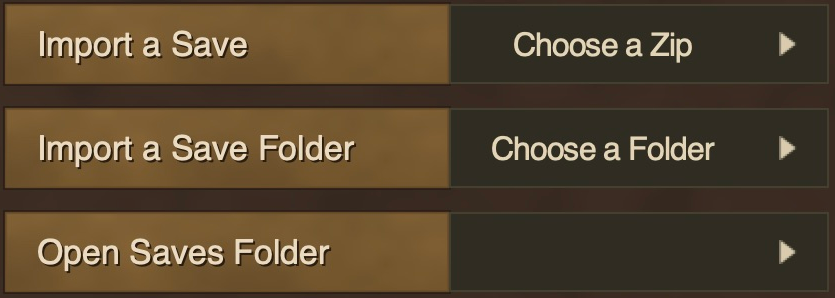 Open full-size image ↗
A save-only backup can leave logs out
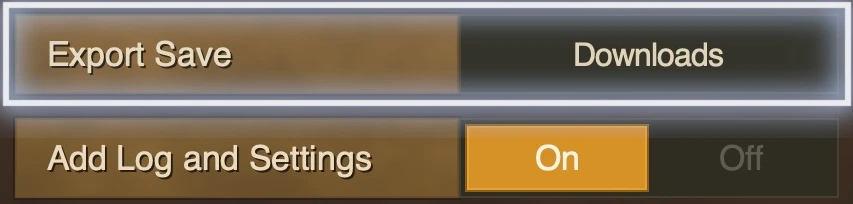
Export Save writes a save ZIP. Add Log and Settings controls whether diagnostic files are included; turn it off for a save-only backup. Downloads is the default destination.
Image source ↗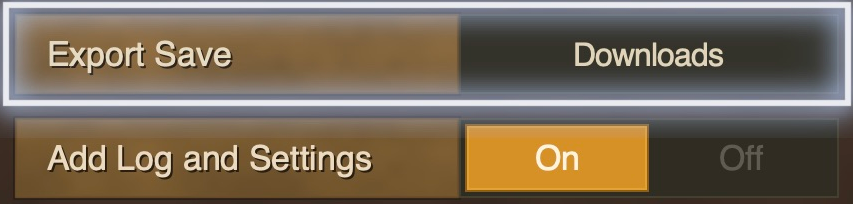 Open full-size image ↗
saves\backup <date time> first. Start the game and check the result.Import a Save Folder recognises supported console backups, nested emulator save folders and another NX2navi profile. A folder whose top level contains progress.sav is treated as one slot: its slot_00–slot_05 folder name selects the slot; otherwise the default is slot_00. Other slots remain in place.
Start with the stage that failed and keep its exact message. A rejected game update needs different steps from an unfinished build or a Vulkan crash after Play. For current 0.10.1, use the matching case below; older cases retain their version labels. Use the platform, version and symptom selector for an ordered plan and the correct log, or copy a support checklist if the problem continues.
logs\nx2navi.log before reopening the game. Record NX2navi version, GPU/driver, game version and the scene.system commit low on a 16 GB Windows PC, review the upstream page-file guidance. It calls for a 32 GB-or-larger initial page file and sufficient disk space.After a driver update, driver-side caches may need rebuilding. Leave preparation to finish. On NVIDIA, the upstream guide recommends NVIDIA app → Graphics → Global Settings → Shader Cache Size → Unlimited so prepared libraries are not repeatedly evicted. This is a driver cache; it is not your save folder.
New textures and pipeline variants can still cause a first-visit pause. Revisit the same route to distinguish this from a repeatable crash; keep the relevant log instead of erasing all caches as a first step.
These match fixes in 0.9.2. Update first, then retest the same upscaling mode and HUD setting without unrelated changes. Keep experimental selective_motion and low-end options separate while diagnosing a baseline image problem.
A 0.9.2 Windows report on an RX 580 2048SP shows the scene alternating between visible and dark while the HUD remains. Both frames below come from that same versioned report, using game 1.1.1.
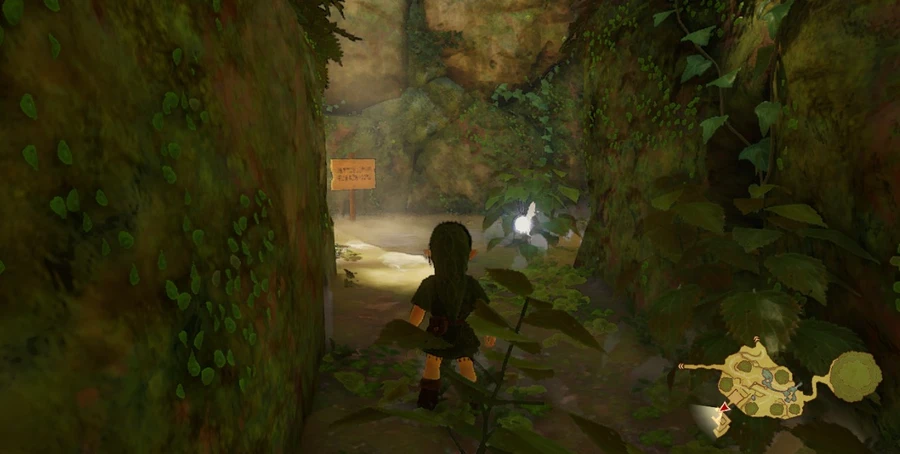
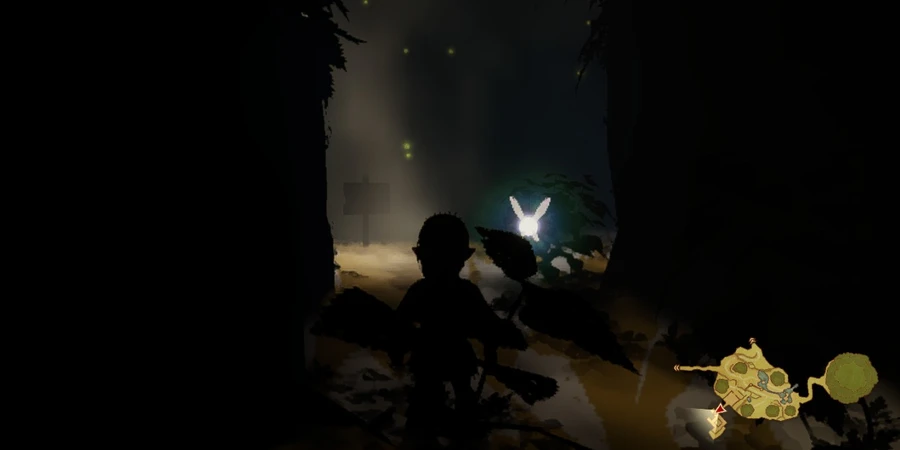
For this pattern, record the exact GPU/driver, game area and settings alongside logs\nx2navi.log. The report reproduces with bilinear scaling and FSR, so changing the upscaler alone is not a complete diagnosis. Use the support checklist to keep that context together.
On 0.10.0 or 0.10.1, focus the running game and press F8 when the problem is visible. Wait for the “Bug capture … saved” note and keep its capture number.
Open the game’s log folder, then captures. Each numbered folder includes the frame, settings, recent log, frame timings and save export. capture.txt is written last and marks a complete capture.
Tell the maintainer the capture number, NX2navi version and what happened. Review the folder before sharing: it contains a screenshot and game progress. The files stay on your PC until you share them.
logs\captures\<number-date-time>\capture.txtCompare the same save by starting the launcher directly, then through Steam, with the same settings. Issue #823 records this distinction on 0.10.0; a shader-precache change helped one reported setup. Preserve the launch-method difference in the report and retest the current release before changing global Steam settings.
Report a reproducible problem to the project’s GitHub Issues, using the requested report fields. Review logs and paths before sharing them; game files and keys are not needed in a report.
The 0.10.1 release includes NX2navi-Linux-0.10.1-x86_64.AppImage, a local build kit with its own Python and pinned Vulkan headers. Match the Linux prerequisites: x86-64 Linux 6.7+ with PAGEMAP_SCAN, Vulkan 1.3 graphics support, and the documented compiler and system libraries.
chmod +x NX2navi-Linux-0.10.1-x86_64.AppImage
./NX2navi-Linux-0.10.1-x86_64.AppImageThe kit defaults to ~/Games/Ocarina. Its play.sh changes into the game folder before starting ocarina. For a manual source build, use the documented command, then launch from that output folder:
python3 -I tools/make_game.py --nup "/path/to/your game.nup" --out ~/Games/Ocarina --jobs 4
cd ~/Games/Ocarina
./ocarina
The four-job choice follows the guide’s 16 GB RAM advice. The AppImage supplies pinned Python/headers, while drivers, compiler and the named runtime libraries still come from the system. Native Linux has separate NVIDIA DLSS libraries; Windows FSR 3.1/4 and frame-generation DLL routes do not apply to the native Linux build.
Run the built play.sh and confirm the game opens. On Steam Deck, use Steam → Power → Switch to Desktop for desktop file and library setup.
In desktop Steam choose Add a Game → Add a Non-Steam Game → Browse. Select the finished game’s play.sh for the AppImage route. If browsing hides scripts, show all files. For a manual build, select ocarina and set the shortcut’s Start In folder to the game directory.
The native Linux executable runs as Linux software. Use a separate Windows shortcut and its Compatibility/Proton choice only for the Windows route. On Deck, return to Gaming Mode and find the shortcut in the Non-Steam library.
Valve’s Desktop Mode and non-Steam guide ↗ · Direct launch works but Steam stutters? Compare these steps →
The current source detects Steam Deck hardware with device_profile = auto. For keys you have not set, it selects fullscreen, a 1280×800 window, a 40 fps cap and four game cores. These are the profile’s starting settings; use the F10 overlay to choose a cap your scene can hold.
NX2NAVI_* launch variable overrides the file.For non-NVIDIA graphics, the kit can use /dev/udmabuf when access and its memory limit are configured; otherwise it falls back to copying and names the reason in mem: log lines. Follow the exact prerequisites before changing system configuration. If play crashes, keep the native Linux device-lost context with the log.
For a native Mac, choose nxnative or the N64 Mac guide.
For Hookshot's continuation on Windows or Linux, follow the Longshot launcher, build and save guide. It uses a separate Launcher/Builder release system. Its NX2navi save-import path covers profile selection and pending-save checks before copying progress.
For a Windows emulator workflow, use the Fritchii download, setup and save-migration guide. Its ready-made lichii.exe runs an emulator library; NX2navi builds the supported game locally. Fritchii’s Saves manager has its own Eden/Lichii copy and profile-repair steps.
Looking for the 3DS remake on Mac? Ocarina ReTuned’s Mac download and preparation guide uses your supported decrypted 3DS ROM. It is separate from this Switch 2 1.1.1 build and the N64 Ship of Harkinian route.
NX2navi recompiles the supported Switch 2 game into native x86-64 code before play. Its download contains build tools and a launcher; your own legally dumped game supplies the program and data. The input-to-output diagram shows the local build.
NX2navi expects Switch 2 Ocarina of Time 1.1.1 and compatible save data for that game. A N64 ROM and Ship of Harkinian progress belong to a different edition. Use the N64 Mac guide for those files, or the NX2navi save-import steps for this project.
Normal updates rebuild from the game files already unpacked on disk. Keep the installed game folder and its build state; use Updates or Rebuild the Game to complete an interrupted update.
Sixteen GB is the published RAM floor, and large areas can still create memory pressure. The default 60 fps limit is a setting, not a measured result for your PC. Start with the baseline graphics steps; Steam Deck users should also follow the Linux hardware and library branch.
Open Game Folder in the launcher. nx2navi.ini is beside the executable; logs\nx2navi.log is the game log. Launcher logs are separate: use Settings → Open Logs Folder. Save the failed run’s log before reopening the game.
The public repository has separate terms for its base import and later additions. Read the base licence and additions notice for the code you plan to reuse.
Give the NX2navi version, game update, operating system, GPU/driver and exact failing stage together. This lets a support forum or an AI chat choose steps for your actual setup. Copy this checklist and fill in the blanks; include only relevant log lines after reviewing local paths.
NX2navi version: 0.10.1 (or your actual version)
Game edition and update: Switch 2 Ocarina of Time 1.1.1
Operating system: Windows or Linux, with version
CPU / RAM / GPU / driver:
Stage: download / build / first launch / F1 settings / gameplay / save import
Exact error or symptom:
Last action before it happened:
Settings or mods changed:
What I tried and what changed:
Relevant log lines (review local paths first):
Question: What is the next step for this version and stage?
Return to symptom-specific fixes → · Back up progress before trying another build → · Report a reproducible app problem on GitHub ↗
This guide follows NX2navi 0.10.1 and fixed source 5ae55db, reviewed 14 November 2026. Earlier launcher and community game images keep their 0.9.2 labels. The mod guide adds current English launcher controls and a worked load-order example.
Browse the project directory → · Choose the N64 Mac app → · Build with nxnative on Mac →